Wednesday, May 14, 2014

Mexican Rice - Food Of The World


This month we the crew from Food of the world are Travelling to Mexico . I am a day late to publish my Recipe for this Month . So many things happened in a month , main thing was i broke my laptop , had to send it for service , Lost all my data ,including the photos i had shot ( I haven't posted it yet too ) , i was sick .... . OK now everything apart after a month of break i am back.


I always do feel that Indian food and Mexican food are quite similar . Both the cuisines uses various flavorful spices . As i cook Indian food daily , when ever we plan to dine out , we usually prefer to go to a Mexican Restaurant. I usually order Shrimp and Fish Fajitas and Spicy Tortilla soup. Oh my gosh , the Mexican restaurant we usually go is the Best Mexican grill i have ever dined . The fajitas are loaded with Shrimp , Fish and Cheese . The best part is the free Tortilla chips with home made dips :) .

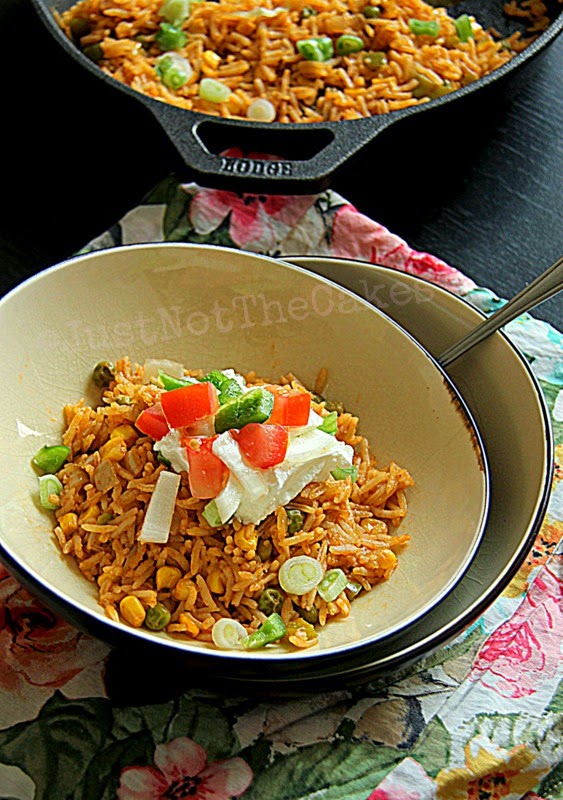
I had prepared Flavorful Mexican Rice . I served with a dollop of  Sour cream and topped with Salsa . I am pretty sure these kinds of rice doesn't need a gravy .

Ingredients :

Long grain rice - 1/2 Cup ( i used basmathi )
Chopped onions - 1/4 Cup
Chopped Capsicum- 1/4 Cup
Green Peas - 1/4 Cup
Sweet Corn - 1/4 Cup
Cumin powder - 1/2 TSP
Salt - To Taste
Tomato Puree / Sauce - 1/4 Cup ( I used spiced sauce )
Chili Powder - If needed 
Bay Leaf - 2
Butter - 1 TBSP
Oil - 1 TBSP
Spring Onions - To Garnish
Water / Chicken Broth - 2 to 21/2 Cups


Instructions:

-  Add the butter and oil in the pan. Once the Butter / Oil is nice and hot , add the bay leaf and rice .
- Make sure it is in the medium heat , Roast it till it is golden brown .
- Add the chopped onions and capsicum . Cook till the onions turn brown .
- Add the Corn and Peas . Sprinkle some salt , chili powder and cumin powder .
- Add tomato sauce . Mix it completely .
- After 5 minutes add the broth or water . Mix it once . Close it with the lid and cook it completely .
- Before that make sure there is enough salt in it .
- Finally when the rice is fully cooked , Mix it once to make sure it is not sticking to the bottom of the pan.
- Sprinkle some spring onions .
- Serve it with sour cream and salsa .


Do visit all the co-host by clicking their photos


Thursday, April 17, 2014

Creamy Chicken Salad / Spread / Dip


Last one week the members of Sssshhh Cooking Secretly Challenge were having fun guessing the ingredients by viewing the pictures of each other . +Priya Suresh  who is the brainchild behind the Challenge came up with a wonderful Challenge by pairing 2 people each month .  Two secret ingredients were given to one another . We are supposed to make a creative dish with the ingredients and on the revealing date that is on 16th to 18th each month the ingredients should be revealed . For this month +Roshni Chandrasekar  from Roshni's Kitchen was my partner . 


As soon as +Priya Suresh  revealed the pairs , i mailed +Roshni Chandrasekar , we had small chitchat , got to know each other . Finally on the same day , we suggested ingredients for each other . As i am a Non- Vegetarian , Roshni suggested Chicken and Cheese . Though i had made lots of dishes with these two combination , i wanted to make something tasty , yummy and simple . 


Our ( H and myself ) resolution for the year 2014 was eating healthy . We finally ended up taking a decision as eating more raw and baked foods at least thrice a week. So many alterations happened in our diet like No All Purpose Flour , No white Sugar , No Vegetable Oil .. The Number of No's kept going on .....  When Roshni suggested Chicken and Cheese i was little excited to create something healthy .. I was firm not to use All Purpose Flour in any form. Then i ended up with this three in one Creamy Chicken Salad / Spread / Dip .  It can be consumed as it is , or used as a spread for sandwiches and it was fantastic as a dip with Gluten Free Grain Tortillas too.


Ingredients -

Chicken - 2 Quarters ( Grilled and deboned )
Parmesan Cheese - 2 TBSP
Onions - 1/4 Cup Chopped
Avocado - 1 (cut into cubes )
Tomatoes - 1 chopped into cubes
Salt and pepper - To taste
Sour Cream - 3 TBSP
Olive Oil - To cook chicken

Instructions -

1.  Cut and clean the chicken . Grill it or cook ( Saute ) it plain with the preferred spices.
2 . Add chopped onions , tomatoes , avocadoes in a bowl ..
3.  Mix everything to make sure everything is mixed well .
4. Add Sour cream  . Give it a quick mix .
5. Finally add cooked chicken and add salt and pepper to taste .
6. Lasty sprinkle the cheese over it .


One good thing about this salad was everything was raw other than the chicken . The oil content was much more lesser . They are so stomach filling . Isnt it a healthy , meanwhile delicious dip . There is no correct or  wrong proportion of ingredients . Using of ingredients are solely depend on us . we could even add zucchini , carrots , lettuce ; everything is our preference. More the creamy you want ,  more sour cream and more avocados can be used .


Sunday, April 13, 2014

White Chocolate Mousse - Egg Free - Gelatin Free


By this time , you guys all will know that i love to make desserts . Once when i was surfing on internet , i happened to see Pineapple Mousse recipe , it was actually on a leading indian channel the host was also a  leading artist . The recipe was mentioned as " Eggless Pineapple Mousse " . To my surprise there was a use of Gelatin on the Mousse ( as gelatin is not a vegetarian ) . I still do not get it " why was it mentioned as eggless mousse " . There are high chances of pure vegetarians who can be misguided with that statement . 

But this is a Pure Vegetarian White Chocolate Mousse .


Mousse is a French Dessert , which is prepared by incorporating air bubbles to give light and airy texture. Generally the texture is gained through whipped egg whites. But , as our recipe is mentioned as Eggless and Gelatin free , i had made this light and fluffy White Chocolate Mousse using just three ingredients.


Ingredients -

 Good Quality White Chocolate - 6 Oz ( Chopped )
 Butter - 2 TBSP
 Clear Vanilla Extract -  1 TSP
 Heavy Whipping Cream - 3/4 Cup
 Sugar - Depending on your sweet tooth ( I didn't need any )


Instructions:

- In a heatproof bowl , add Butter and Chopped White Chocolate .
- Place the bowl on top of the double boiler and completely melt the chocolate . Allow the chocolate to cool down completely.
- Meanwhile whip the heavy whipping cream till the " Stiff Peak Stage ". ** Notes
- Gently Fold the Melted White Chocolate with whipped cream .
- Do not over fold , as it may deflate the air in the mousse .
- Serve it in the Dessert bowl . Wrap it with cling wrap and refrigerate for couple of hours.
- Garnish it and serve .


** Notes **

- When whipping the whipped cream make sure the bowls and whisk are refrigerated for at least and hour.
- or Ice Bath Method can be used too.


Friday, April 11, 2014

British Asparagus w/ Chilli and Lime Butter


This is what i do when i am home alone .When i am really bored to cook  ,  i Saute the vegetables i have and make a quick dip for it . Bingo lunch is done . When i was looking for recipes from UK , majority were pies and scones . I wanted to make a simple dish for me and i had a bunch of Asparagus too . So  landed in a quick Asparagus recipe . I had tweaked the recipe according to my taste.


Ingredients :

For Sauteed Asparagus:

Asparagus - A bunch
Salt and Pepper - Seasoning
Butter - To Saute
Garlic - 3 cloves 
Almonds - sliced 3 TBSP

 Instructions:

- Clean and cut the ends of Asparagus .
- Heat some butter in the pan . Saute the Asparagus sprinkle some salt and pepper .
- It hardly takes 3 minutes . Place it in the bowl .
- Using the same pan , add little more butter . When the butter is melted and it is hot , add the sliced garlic and roast it , and finally add the sliced Almonds and saute it for a minutes.
- Sprinkle the Garlic and Almonds on top of Asparagus and serve with chilled Chilli and Lime Butter .


For the Chilli and Lime Butter :

Butter - 1 stick ( Room Temperature )
Coriander Leaves - 3-4 TBSP Chopped
Chilli Flakes - 1/2  TBSP ( Depending on the spice level)
Cumin seeds - 1 TSP ( Coarsely Ground)
Pepper Powder - 1/2 TSP
Lime Juice - juice of 1/2 lime
Salt - A pinch 


Instructions:

In a bowl mix all the ingredients together.
Place the mixture on a cling wrap and twist both the ends like a sausage shaped roll.
Refrigerate it till you use them .


Do visit all the co-host by clicking their photos


Thursday, April 10, 2014

No Knead - Cheese Bread


Whats better ??? Store bought bread or home made ??? Yup ..Home Made Breads are always better . I love to bake my own bread loaf . For a newbie baker , these kinds of No Knead Breads are advisable . This type of bread is easy to make , less work involved and  more over they are delicious like every other bread.  But one thing you should remember before baking this bread is , this is not a instant bread . If you have planned it to bake it today . You should mix all the ingredients a day ahead and allow it to proof for 18- 24 hours. Do not worry about the dough turning to sourdough ( It doesn't actually turn to sourdough). This bread is really delicious and its so good as sides for soup.


Ingredients :

All Purpose Flour - 1 1/2 Cup + More to Knead and dusting
Warm Water - 3/4 Cup
Yeast - 1/4 TSP
Salt - 1/2 TSP
Cheese - 1/2 Cup - I used mozzarella you can use any kinds of cheese.


These kinds of no -knead breads are really easy to work with . 

Instructions:

- In a large bowl combine All Purpose Flour ,Salt and Yeast . ( Try to use a bowl which has lid on it , so it will be easy to cover the dough and leave till the next day ). 
- Pour in the warm water and mix it with a wooden spoon , make sure the flour is well combined and no lumps in the dough .
- Cover it with the lid , Leave it in the room temperature for 18- 24 hours.
- Place the dough in the flour dusted working surface . Knead it for 2 minutes .
- Fold the cheese in to the dough . Place it in the Baking tray . Cover it with the wet damp cloth .
- Allow it to raise for an hour . 
- Pre - heat the oven at 400 F. Place a small bowl with some water in the corner of the oven .**
- Bake the bread covered for 30 minutes . Uncover  and bake it for another 15 - 20 minutes at 300F. 


**Notes**

- It is a must that the dough should be on the room temperature for 18- 24 hours .
- Placing some water into the oven when baking , moisture from water , releases the steam that makes the bread / cake to have softer crust . 
- When you place the dough on the baking tray ,make sure to dust some flour and place it .